Espoma Organic
  • Products
    • Close
    • Product Line Overview
    • Plant food finder
    • Garden Fertilizers
    • Potting Soils
    • Lawn Fertilizers
    • Liquid Fertilizers
    • Single Ingredients
    • Conventional Plant Foods
    • Animal Care Products
  • Where to Buy
  • Our Story
    • Close
    • Our Story
    • Locations
    • Historical Timeline
    • Our Commitment
    • Directions
    • Solar
    • Join our Team
    • Espoma Brand Partners
  • Learn
    • Close
    • Espoma Blog
    • FAQ’s
    • Pocket Guide
    • Espoma Guides
    • Garden Clubs
    • Safe Paws Lawn
    • PRODUCT FACT SHEETS
    • Fertilizer Fundamentals
      • Close
      • Understanding Plant Nutrition
      • Reading Labels
      • Choosing the Right Type of Fertilizer
      • Terms & Definitions
    • Gardening Projects
    • Resource Links
  • Contact Us
  • Menu Menu

Tag Archive for: Spring Gardening

Grow Fresh Herbs at Your Fingertips

May 14, 2015/in Fruits & Vegetables, Spring Gardening, Vegetable Gardening

Forget dried, stale or store-bought herbs. There’s a cheaper, closer and fresher alternative.

Plant an herb container garden near your kitchen or next to the grill.

Having fresh, organic herbs right where you cook makes them easier to incorporate into any meal.

With just a few snips, fresh herbs will invigorate your cooking. With just one bite, you’ll instantly taste the difference. Plus, you can use fresh herbs in unexpected ways, like flavoring olive oil, tea or water

Whether you garden in a large space or a small apartment, an herb container garden is convenient and delicious!

All you need to cook up your next great dish is a sunny spot, a roomy container, the best organic potting mix and your favorite herbs.

First decide which (and how many) herbs to grow. Check old grocery lists or recipes to see which herbs you buy the most but especially spend the most money on. Choose those and grow some just for fun like relaxing lavender and lemon balm!

Herb
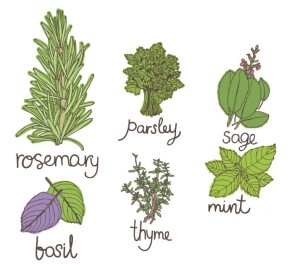
Most herbs will work in a container but the best herbs to plant in containers are: Basil, Mint, Rosemary, Thyme, Oregano, Cilantro, Parsley, Sage, Chives, Lavender, Tarragon, Lemon Verbena

Now pick a container with drainage holes. With container gardens, you can buy a modern or traditional container or get creative and use found objects.

Grouping herbs together that like the same amount of water, light and soil in the same container.

How many herbs you should plant in one container? There’s no hard and fast rule. Use your judgment and read the plant tags.

Go ahead and arrange containers on your deck, patio or any place that’s easy to access when you’re cooking. The area should get between 6-8 hours of sunlight a day.

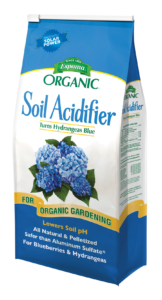
Once your containers placed, fill half-way with a high-quality, organic potting mix such as Espoma’s Organic Potting Mix. Since you’ll be eating and serving them, organic potting soil is a must!

Now arrange the herbs to your liking! Try 3 or 4 different placements before planting. Read the plant tags to see how big the plants will get, too. And just like those class photos, the tallest go in the back!Container Garden

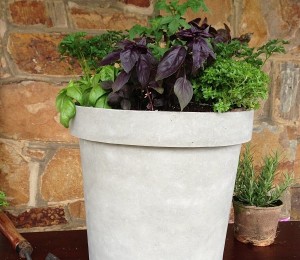
Once you’re happy with where the herbs are, fill the rest of the container with Espoma’s Organic Potting Mix. For a two gallon container, add 1 cup of Espoma’s Organic Bio-Tone Starter Plus to the top 4-6” of soil. For a five gallon container, add two cups.

Pat the soil to firm and remove air bubbles.

Feeding herbs with an organic fertilizer regularly promotes bigger plants, so you’ll have a bigger harvest. Bio-Tone Starter Plus is a microbe enhanced all natural plant food that will help your herbs to establish quickly.

Give your herb containers 1” of water a week.

Harvest herbs often! The more you pick, the more they’ll grow. Don’t you just love plants like that?

What herbs are you planting this year? Share your favorites by commenting below!

https://www.espoma.com/wp-content/uploads/2015/05/mint-521401_640.jpg 460 640 espoma https://www.espoma.com/wp-content/uploads/2023/05/espoma-logo340w-1.png espoma2015-05-14 08:35:362019-05-07 10:08:45Grow Fresh Herbs at Your Fingertips

Safe Paws for Pets Everywhere

May 12, 2015/in Lawn, News, Spring Gardening

Have you heard about our Safe Paws initiative and April’s Safe Paws Challenge?

The Espoma Company is equipping pet owners with tips to keep pets safe outdoors by avoiding the dangers of common lawn hazards.

During the month of April, we used our Facebook page to raise awareness and made a $700 donation to the National Canine Cancer Foundation.

In addition to providing healthy and safe lawn care tips on Facebook and Twitter, we brought our Safe Paws campaign to three garden centers in the Mid-Atlantic.

Primex Garden Center, Homestead Gardens and Bucks Country Gardens welcomed us with open paws for our Safe Paws launch. Our events included on-site adoptions, local vet Q&A’s, a Safe Paws photo booth, treats and more from local pet vendors.

What great events! We had perfect weather and great turnouts. Most importantly, we heard from every pet parent that a healthy lifestyle for their pets in their #1 priority.

We listened to pet parents tell their tales and we heard their concerns. Some of you never considered the damage harsh chemicals could be doing to your animals! But many of you told us stories about your sick pets, and how you’ve stopped using chemicals on your lawn to protect them.

Lawn chemicals are potentially harmful to both cats and dogs that run and play in yards, neighborhoods and parks, and may be a contributing factor in the increase of cancer in pets. According to the National Canine Cancer Foundation, an alarming one out of every three dogs is diagnosed with cancer.

With knowledge, there is power. So we’re working to make sure every home is aware of the benefits of an organic lawn.

Our new Safe Paws guide, which we unveiled at the events, showed guests that

It’s surprisingly easy to do our job when surrounded by puppies!

Baxter Safe Paws

Five tips for keeping paws safe:

  1. Inspect your yard for hazards. Dogs and cats are curious. Keep dangerous chemicals such as fertilizers, insecticides, paint and gasoline out of reach.
  2. Switch to an organic lawn food. Harmful lawn chemicals can easily be ingested or tracked into homes, keep them off of lawns to begin with. Espoma’s annual feeding program features products that provide 2.5x more slow release nitrogen than the leading conventional program. And you don’t have to worry about your kids or pets rolling around in chemicals on the lawn.
  3. Encourage pets to stay away from certain areas in the yard by creating borders using soft materials like cedar mulch.
  4. Provide shade and shelter for pets while they’re hanging out on the lawn. Consider adding a dog house and provide plenty of water.
  5. Fleas and ticks hide in longer grass. Mow your lawn to the proper height to keep fleas and ticks at bay.

Share a photo of your favorite pet on our Facebook page! And let us know where you’d like us to have Safe Paws events next year!

https://www.espoma.com/wp-content/uploads/2015/05/11149381_971434126202903_1791853361385287830_n.jpg 960 640 espoma https://www.espoma.com/wp-content/uploads/2023/05/espoma-logo340w-1.png espoma2015-05-12 08:48:422024-09-17 09:11:36Safe Paws for Pets Everywhere

Mother’s Day Container Garden Ideas

May 6, 2015/in Flowers, Landscaping, Spring Gardening

Freshly baked chocolate-chip cookies, homemade sandwiches with the crusts cut off and secret passwords— mom did it all for you. She showered you with love in so many ways, big and small.

Now it’s your turn to remind Mom how much you truly appreciate her.

Since Mom has made so many wonderful treasures for you over the years, take the time to make her a gift she’ll enjoy for months!

From a traditional hanging basket to a funky container garden, select a container that’s just her style, fill it with her favorite flowers and present a homemade gift that will bloom and delight for months!

Watch our video on container gardening for each step of the process, or follow the steps below.

First, find the perfect container. There are tons of fun, colorful and patterned containers out there. Or get creative and use an unexpected object. Either way, select the one that screams “Mom!” to you.

Be sure your container has drainage holes at the bottom and be sure it isn’t too big. Once the container is filled with soil, it can get pretty heavy.

Next, look for 3-5 flowers, grasses or greenery. If you already know Mom’s favorite flowers, definitely use those.

Then, choose plants that spill, thrill and fill! You want a plant that cascades, one that mounds and one that stands out among the rest.

You can mix colors, or stick with a monochromatic color scheme. Have fun with it!

Regardless, it’s best to make sure your plants like the same growing conditions. As a final check before checkout, compare plant tags to see if they all need the same amount of sun and water.

While you’re still shopping, grab a bag of the best organic potting mix.

Espoma Organic Potting Mix is not only 100 percent organic, but contains Myco-tone Mycorrhizae, too.

Plants growing in Espoma Organic Potting Mix require up to 30 percent less water than other potting soils. With water restrictions a concern, Mom will use less water for her container.

Plus, Espoma Organic Potting Mix helps your plants adjust to their new home better and grow bigger roots for bigger plants.

Now, get crafty!

  1. Fill the container 3/4 full with Espoma’s Organic Potting Mix.
  2. Mix in 2 tablespoons of Espoma’s Bio-tone® Starter Plus with the soil to give it that extra oomph. This organic plant food encourages bigger and more plentiful blooms!
  3. Remove the plants from their original containers and arrange them in the new planter.
  4. Play around a bit. Move the plants around to see where each plant looks best.
  5. Once the plants look perfect to you, fill in any gaps in the container with organic potting soil.
  6. Water well.
  7. Stick your Mother’s Day card in the soil on a floral pick and tie a bow around the container.

Wait till you see Mom’s face when you arrive on Mother’s Day with a beautiful, homemade container garden!

Share a photo of your Mom with her homemade Mother’s Day container on our Facebook page! And tell her Happy Mother’s Day from Espoma!

https://www.espoma.com/wp-content/uploads/2015/05/container-garden-mom.jpg 1682 1697 espoma https://www.espoma.com/wp-content/uploads/2023/05/espoma-logo340w-1.png espoma2015-05-06 17:03:142019-05-07 10:08:45Mother’s Day Container Garden Ideas

How to Plant an Organic Vegetable Garden

April 30, 2015/in Vegetable Gardening

Want to always have fresh veggies on hand, taste juicy tomatoes and save $600 annually on grocery bills?

We thought so! Get all that and more by planting an organic vegetable garden.

The veggies will be the best you’ve ever had, hands down. And, you’ll feel incredibly empowered by growing your own food. When you plant and harvest your own vegetables, you know your food.

You can be confident you’re feeding your family the absolute best. No worrying about the freshness of the produce, or any applied pesticides. Your veggie garden will be organic from start to finish.

And you’ll slash your grocery bills. The average family spends $70 to make a vegetable garden and grows an estimated $600 worth of vegetables, according to the National Gardening Association. Think about all you could do this summer with that extra money.

The first step to creating a veggie garden like that is deciding what to grow.

To save the most, grow veggies that are expensive at the store —tomatoes, salad greens, herbs and onions, etc. Plus, plant what you love to eat!

Next, strengthen your soil. Improving soil creates big, healthy roots, which absorb more nutrients and water. Before planting, ensure success by performing a quick soil test.

Then, make sure your soil is jam-packed with the nutrients your veggies need, so they will always have something to eat.

An organic fertilizer like Espoma Organic Garden-tone, provides vegetables with nutrients they need to grow big and strong. When fed with an organic plant food regularly, you’ll have a bigger veggie crop than you ever thought possible.

Created for professionals, Garden-tone also helps improve the soil as it feeds the veggies.

So, when preparing your vegetable bed, use 3.5 pounds of Espoma Garden-tone per 50 square feet. Then, pair with either compost or Espoma Organic Garden Soil. Mix both into the top 4-5” of soil.

Once your soil is ready, plant either cool-season or warm-season crops depending on what your weather is like.

We know this winter and spring have been cold for many regions. If a hard frost is still possible, plant cool-season crops like broccoli, salad greens and herbs. If the threat of frost is gone, feel free to plant warm-season crops too, such as peppers, tomatoes and beans. Get the lowdown on frost dates here.

Now here comes the fun part – planting.

Remove plants from their containers. Dig a hole as deep and an inch wider than the container they were growing in. To see how far apart to plant them, check the plant tag!

Arrange them in the hole and fill with soil. Remove any pesky air pockets by pressing down on the soil.

All that’s left to do now is lightly water them since vegetables need about 1” of water a week.

In 7-10 days, feed your new veggies another helping of Garden-tone.

What’s the best (or most memorable) vegetable you’ve ever grown? Comment below to share your story.

https://www.espoma.com/wp-content/uploads/2015/04/How-to-Plant-an-Organic-Vegetable-Garden.jpg 853 1280 espoma https://www.espoma.com/wp-content/uploads/2023/05/espoma-logo340w-1.png espoma2015-04-30 07:49:032019-05-07 10:09:23How to Plant an Organic Vegetable Garden

Get More Blooms on Roses with a Monthly Organic Feeding

April 21, 2015/in Flowers, Spring Gardening

Imagine growing a rose bush bursting with big, beautiful flowers. It’s easy.

All your roses need is a well-balanced meal. Roses are one of the hungriest plants, so they need to be fed often to perform their best.

You’ll instantly see the difference once you start regularly feeding your roses. Bigger, better and even more roses are on their way! Plus, your plants will look healthier since they’ll fight off disease more efficiently.

It’s amazing how much a healthy, organic meal can improve your roses.

Your roses are waking up now since spring is just beginning. They’ve made it through a long winter and they are starving! Feed them the most nutritious meal you can.

Espoma’s organic Rose-tone includes more nutrients than any other rose food. Most rose fertilizers contain three nutrients — nitrogen, phosphorus and potassium (N-P-K). Rose-tone goes far beyond that. This organic rose food contains 12 more micronutrients roses need, including iron, calcium and magnesium.

Feeding roses with Rose-tone is like providing a perfectly balanced meal. Your roses get all the nutrients they need to work as hard as they can.

Another benefit of organic rose foods, such as Rose-tone, is the gradual release of nutrients. Due to its slow-release formula, Rose-tone will never burn or leach plants. Plus, this is the only organic rose food that improves soil structure.

In beds, spread 6 pounds of per 100 square feet. For individual roses, use 1¼ cups of Rose-tone per plant.

Now, let’s boost your roses and soil with an organic feeding.

For established roses in beds, spread 6 pounds of Rose-tone per 100 square feet. For individual roses, use 1¼ cups of Rose-tone per plant.

Sprinkle the granular organic rose food around each plant out to the widest branch. This encourages your roses to stretch their feet and grow a little!

Then, scratch the food into the top 1” of soil.

If you’re planting new roses, add a mixture of peat moss and 3 cups Rose-tone to the planting hole.

Either way, feed your roses monthly from early spring to mid-September to keep them producing beautiful blooms.

Feeding roses with organic plant food is one of the best ways to get bigger, healthier roses. Share another trick to keep roses booming below.

https://www.espoma.com/wp-content/uploads/2015/04/roses-espoma2.jpg 872 873 espoma https://www.espoma.com/wp-content/uploads/2023/05/espoma-logo340w-1.png espoma2015-04-21 11:01:542019-05-07 10:09:24Get More Blooms on Roses with a Monthly Organic Feeding

Feed Boxwood with Organic Plant Food in Early Spring

April 21, 2015/in Trees & Shrubs

Evergreens — the name says it all. These plants and shrubs add color to your garden all year long, even in the dead of winter!

Though, we admit there’s one evergreen we love most: boxwoods.

Boxwood shrubs do it all. They’re super easy to care for, stay green all winter and are deer resistant.

These shrubs add instant definition, structure and privacy to outdoor spaces. Plus, boxwood shrubs morph into any shape when pruned. If an artful topiary isn’t for you though, they look just as beautiful when pruned slightly or left to grow free-form.

As easy as these shrubs are, there’s one BIG mistake people make when growing boxwood.

All too often, people believe that Holly-tone fertilizer is the feeding solution for boxwoods, just like they do with other evergreens. But that’s not the case.

While boxwood is part of the evergreen family, there’s one thing that makes them different. Most evergreens need to be fed Holly-tone, an organic fertilizer for acid-loving plants. But, boxwood — and arborvitaes — are evergreen shrubs that are not acid-loving plants. So, they need an all-purpose plant food.

Avoid the #1 mistake people make when growing boxwood. Fertilize your boxwood with an organic all-purpose plant food to keep them a healthy green. Plus, feeding these shrubs in early spring helps them fight off disease all season.

How to Feed Established Boxwood:

To see how much fertilizer your boxwood needs, measure the width of your boxwood with a tape measure.

For each foot, use 1 cup of Espoma Plant-tone. For example if your boxwood is 4’ wide, use 4 cups of organic plant food.

Then, sprinkle around the boxwood’s drip line, which is a circle formed around the shrub’s widest branch.

How to Feed New Boxwood:

If you want to add a border or line a path, boxwood is just what you’re looking for. Go ahead and get planting.

Boxwood grows best in zones 6-8. As always before planting, make sure the area you’d like to plant matches the plant’s likings. Read that plant tag! Most boxwood need full to partial sun and well-drained soil.

Once you’ve found the perfect spot and the perfect boxwood, it’s time to plant.

Dig a hole as deep and twice as wide as the root ball. Scoop a handful of soil to test, too. Boxwood needs a soil pH between 6 and 7. If your pH is too low, add Espoma Organic Garden Lime. If your soil pH is higher than 7, amend with Espoma Organic Soil Acidifier.

Now, loosen roots and position boxwood in the hole.

Replace 1/3 of the soil with compost or Espoma Organic All Purpose Garden Soil. And, mix in 1-2 cups of Organic Plant-tone. Adding an organic plant food now helps plants thrive in their new home.

Then, fill the rest of the hole with amended soil or Espoma Garden Soil.

Lightly water now, and continue watering once a week during spring and summer.

Finally, make the boxwood look right at home by adding 2-3” of mulch to control weeds and conserve water.

Boxwood transforms any area into a defined, stately space. Soon, these beautiful evergreens will even be dotted with sweet, white blooms.

What’s your favorite evergreen? Comment below to share!


Where to Buy


https://www.espoma.com/wp-content/uploads/2015/04/Feed-Boxwood-with-Organic-Plant-Food-in-Early-Spring.jpg 720 1280 espoma https://www.espoma.com/wp-content/uploads/2023/05/espoma-logo340w-1.png espoma2015-04-21 08:01:252021-01-20 13:40:12Feed Boxwood with Organic Plant Food in Early Spring

How to Plant Colorful Flowering Shrubs: Azaleas and Rhododendrons

April 7, 2015/in Landscaping, Trees & Shrubs

A yard without shrubs is like a completed puzzle, minus one piece. The look is almost perfect, but something is missing! Shrubs work wonders — especially ones with bold, colorful flowers. These easy to care for plants instantly fill in gaps in your garden landscape and look fabulous every season. Complete your garden by planting a shrub or two today! Azaleas and rhododendrons are some of the most popular flowering shrubs. Blooming from late spring to early summer, these shrubs thrive in almost any garden. Plus, they come in virtually every color of the rainbow — from bold pinks, purples, and reds to soft, muted yellows and whites. As an added bonus, hummingbirds and bees cannot get enough of azaleas and rhododendrons.

For Established Shrubs: Spring feeding helps develop new growth and the production of new flower buds. Sprinkle one cup of Holly-tone per foot of branch spread now. Holly-tone is long-lasting so you’ll only need to fertilize twice in a season. Don’t wait too long, or you risk encouraging green vegetative growth at the expense of flower bud development. Once now, and again in the fall will ensure a perfect Rhody!

For New Shrubs: Spring is the perfect time to plant so pick your favorite color and variety. Before buying, check the plant tag to see if you have enough space for a full-grown shrub. Azaleas and rhododendrons can range from 2 feet to more than 20 feet tall! If planting shrubs in a row, ensure you have enough space to plant 2 feet to 6 feet apart depending on how big your shrubs will get. Now, before you start digging, choose a spot for your shrub and envision the great impact these plants will have on your landscape! Both these flowering shrubs like to hang in the shade and do not grow well in full sunlight. So, make sure you’ve selected a perfectly shaded spot!

Before you start digging, plan for growth. If planting shrubs in a row, ensure you have enough space to plant 2-6’ apart depending on how big your shrubs will get. These flowering shrubs are so easy to care for because most of the work is done before planting. Keep azaleas and rhododendrons bursting with beautiful blooms by picking the right spot and ensuring you’ve got ideal soil for growing. Don’t forget to test the soil! These acid-loving shrubs need a soil pH of 4.5-5.5. If your soil test reveals a higher pH, your soil is alkaline. Solve the problem by amending with Espoma Organic Soil Acidifier.

Pink Flowers on bush

Once your soil is ready, it’s time to plant! Dig a hole as deep as the root ball and twice as wide. Then, remove the shrub from its original container, loosen the roots and dip in a bucket of water. Next, arrange the shrub in the hole, so the top of the root ball is slightly about the ground’s surface. Fill half the hole with compost, peat moss or humus, and mix in 1 cup Holly-tone fertilizer for better blooms. This organic plant food is specially crafted for acid loving plants, like azaleas and rhododendrons. Feeding new shrubs with an organic fertilizer now keeps them well-fed for months, spurs deep evergreen color and dynamic blooms. Fill half the hole with Espoma Organic All Purpose Garden Soil. Now finish planting your shrub by filling the hole with Espoma Organic All Purpose Garden Soil, and add 2-3” of mulch. Water now, and tomorrow, too.

Doesn’t your garden instantly look brighter? For more tips on caring for azaleas, rhododendrons or other acid-loving plants, click here. We’d love to see how a flowering shrub completed your garden. Share a before and after picture on our Facebook page!

*****

Featured Products: 

Where to Buy


https://www.espoma.com/wp-content/uploads/2015/04/blossom-1194065_1920.jpg 1303 1920 espoma https://www.espoma.com/wp-content/uploads/2023/05/espoma-logo340w-1.png espoma2015-04-07 09:56:172024-09-25 07:51:43How to Plant Colorful Flowering Shrubs: Azaleas and Rhododendrons

Feed Your Flower Bulbs Now with an Organic Fertilizer

April 6, 2015/in Flowers, Landscaping

Breathe it in! Spring has arrived and brought the first flowers of the year with it! After the white of winter, sunny daffodils and a rainbow of tulips are a welcome sight.

Flower bulbs are inexpensive, easy to plant, provide stunning cut flowers and can last for years when taken care of properly.

The secret to keep spring flowering bulbs producing year after year is a spring time feeding of Bulb-tone.

Think about it. When planted, bulbs are packed full of nutrients to last all winter. Come spring, they’ve used all the food they have stored.

It’s like they’ve just run a winter-long marathon — and now they need you to greet them at the finish line with snacks and water.

Right now, your spring bulbs — tulips and daffodils included — are exhausted and starving even if they don’t look like it!

So, they need a hefty feeding to keep them robust.

Bulb-tone gives them everything they need to come back strong next year. Fertilizing spring bulbs also helps them fight off diseases and pests.

So, when should you feed spring flowering bulbs?

Fertilize spring bulbs after the plants have bloomed and are about 6” tall. That’s just about as tall as a dollar bill!

Now, what should you look for in bulb food?

Use an organic plant or bulb food that is low in nitrogen and has a higher amount of phosphorous. Nitrogen is the first of three numbers on fertilizer bags, — phosphorus is the second number on the bag. For example, Bulb tone by Espoma has a 3-5-3 Nitrogen- Phosphorous-Potassium ratio, which is exactly what bulbs need.

The advantage of using a plant food made specifically for bulbs is that it provides a complete feeding.

Your bulbs will love Espoma Organic Bulb-tone. This specially formulated bulb food is fortified with microbes to create a healthy soil and environment for bulbs. Plus, of course, it’s pet and kid friendly.

Now to boost spring bulbs, apply Bulb-tone at a rate of 4 lbs. per 60 square feet. Simply sprinkle the organic bulb food around the bulbs to ensure they come back stronger than ever next year.

One thing to remember – leaves on flowering bulbs produce food, and keep bulbs well fed throughout winter. So embrace your bulbs’ leaves! They add a lovely pop of glossy greenery to your landscape.

Only cut bulbs’ leaves when they begin yellowing or showing signs of decay. For tulips and daffodils, this can happen as late as June or July.

Now that your spring blooming bulbs are stocked with food and nutrients, they should come back next year!

What’s your favorite spring blooming bulb? We love white and yellow daffodils with green leaves – since they showcase Espoma colors! Share your favorite on our Facebook Page.

https://www.espoma.com/wp-content/uploads/2015/04/2499490616_d446043e1a_z.jpg 480 640 espoma https://www.espoma.com/wp-content/uploads/2023/05/espoma-logo340w-1.png espoma2015-04-06 10:02:092019-05-07 10:09:24Feed Your Flower Bulbs Now with an Organic Fertilizer

Wait! Before You Plant This Year, Test the Soil!

March 17, 2015/in Vegetable Gardening

Healthy Soil is the Secret to a Great Garden

Want to grow bigger tomatoes, taller sunflowers and all-around healthier plants this season?

The secret is in the soil. Read more

https://www.espoma.com/wp-content/uploads/2015/03/soil-test.jpg 500 800 espoma https://www.espoma.com/wp-content/uploads/2023/05/espoma-logo340w-1.png espoma2015-03-17 19:04:452019-05-07 10:09:24Wait! Before You Plant This Year, Test the Soil!

Apply Mulch Now for Benefits all Season

March 12, 2015/in Landscaping

Spring is almost here — only eight more days! We are itching to get our hands dirty in the garden.

Never do we appreciate the richness of the soil or the sunshine more than at the start of spring. Plus, our garden seems just as happy to see us.

During these first few weeks, we set ourselves up for success in the season ahead.

And one of the first items on the to-do list is laying a new bed of mulch. Not only does it look great and make your neighbors envious, but mulch provides a world of benefits!

Organic mulch can reduce water use in the garden by 25-50 percent, which saves money on water bills and conserves water. A thick blanket of mulch reduces evaporation, so you don’t have to water as much. Mulch also controls weeds. Plus, your flower beds look polished and complete with a finishing touch of mulch.

Best of all, organic mulch improves soil health as it decomposes throughout the season.

To reap these benefits, mulch has to be organic.

While non-organic mulches, such as plastic film and rubber, are cheaper, they cause major problems later. Inorganic mulches do not break down over time, so they don’t condition the soil. Even worse, they begin to block air and water from plants’ roots. Nine out of ten times, you’ll need to remove non-organic mulches by hand later.

Natural mulches are composed of plant matter and are very popular. From wood chips and pine needles to shredded bark, pick the organic mulch you like best. These mulches decompose over time which helps improve the soil but it also means they must be replaced once or twice a year.

How do you apply it? It’s easy and can be done this weekend.

First, you’ll want to lightly rake the soil to loosen up the surface. Once loose, pull any weeds or dead plant material.

Then, give your mulch the smell test. Mulch should smell woody or earthy; if mulch smells sour like vinegar, replace it entirely.

This is an ideal time to feed evergreen and acid-loving plants such as rhododendrons, azaleas, dogwoods and hollies with Holly-tone. Apply it in a circle around the drip line of shrubs or trees.

Finally, lay 2 – 3” of mulch around established plants. Mulch that’s too deep can actually smother young plants.

When mulching trees, the mulch should extend away from the plant to a little beyond the drip line covering a bit of the roots. But don’t build volcanoes! Never pile up mulch. Instead, keep 2 – 3” away from the stems of woody plants and 6 – 12” away from buildings to avoid pests.

Keep your garden healthy and your home safe this season by choosing organic mulch. Make it a priority on your spring garden to-do list.

https://www.espoma.com/wp-content/uploads/2015/03/mulch-early.jpg 1183 710 espoma https://www.espoma.com/wp-content/uploads/2023/05/espoma-logo340w-1.png espoma2015-03-12 19:10:402019-05-07 10:09:24Apply Mulch Now for Benefits all Season
Page 14 of 15«‹12131415›
Where to Buy

Get News & Updates

Recent Posts

  • Video: Feeding Evergreens with Skye Hamilton 🌲
  • VIDEO: A Formal Garden Tour with Summer Rayne Oakes
  • VIDEO: Repotting in the Greenhouse with Garden Answer
  • VIDEO: How to Winterize Your Chicken Coop with Summer Rayne Oakes
  • VIDEO: Planting Spring Bulbs in Containers 🪴🌷 with Summer Rayne Oakes

Tags

All-Purpose Potting Mix bio-tone Bio-tone Starter Bio-tone Starter Plus Cactus Mix caring for houseplants Container Gardening DIY project Espoma espoma grown espoma organic Espoma Organics Espoma Video fall gardening Family fert flower garden flowers garden Garden Answer Gardening gardening tips gardens grow holly-tone houseplants Indoor! indoor gardening indoor plants Kaleb Wyse organic organic fertilizer Organic Gardening organic plant food Organic Potting Mix Outdoor Gardening Planting plants Potting Mix potting soil Spring Gardening summer rayne oakes vegetable garden Vegetable Gardening Wyse Guide

Espoma. A Family Tradition Since 1929.

Espoma Organic logo
  • Espoma Dealer
  • Espoma Pro
  • Garden Club
  • Privacy Policy

Scroll to top